The Horde Arena is an unlockable area accessible through the 12 Key door in Central Town.
Collectables[]
- Black Outfit
Arenas[]
Each area (East, North, West, South) has its own arena. The arenas for each area hold their respective enemies. When entering each arena, your ![]() Health Kits will reset to zero, and in each arena 4 Health Kits can be found, with the exception of the North arena which contains 5.
Health Kits will reset to zero, and in each arena 4 Health Kits can be found, with the exception of the North arena which contains 5.
Entering an arena will trigger a countdown of about 4.5 seconds, after which the first wave will start. During the countdown getting the health kits around the arena is recommend. Each of the 5 arenas has a total of 10 waves, each wave having progressively more enemies than the previous. After killing all enemies on the final wave, there will be additional endless waves to see how many enemies you can clear. These waves will not end until The Drifter has died.
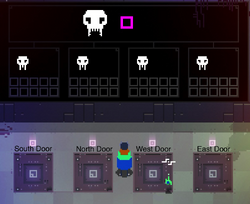
In the main lobby there are 4 scoreboards for each arena. The scoreboards will display your best round by filling in the squares left to right. The first row is for the first 5 rounds and the second for the last 5 rounds. Beating the arena will update the top scoreboard to the highest round count along with filling in all of the squares for that arena.
General Tips[]
The overall strategy for beating the arenas is to not take unnecessary damage. If you are continually dying, keep track of what is killing you and focus on not getting hit rather than clearing. This step will save your Health Kits for future rounds.
Another tip is to spawn kill certain enemies. Spawn killing the enemies allows you to not worry about their attacks as well as clearing them for the wave. Since the spawn process waits until one has spawned, to spawn the next, it is possible to sit at the spawning pad and continually kill them. However, doing so is not recommended since other enemies will spawn around the arena and attack you.
Enemy control is possible to do and helps to complete the wave immensely. Maintaining it throughout all the waves is somewhat difficult in some of the arenas due to certain enemies, so get used to dodging and attacking.
Before attempting the arenas, taking a look at all the enemies attacks, damage, and strategy is a huge plus when trying to kill big enemies quickly.
Unlocking every Ability and Upgrade is the best way to increase your chances of beating each of the arenas.
North Arena[]
The North arena is the easiest arena to complete. With a total of 5 Health Kits and easy enemies, it makes the arena very simple. There is a total of 5 spawn platforms in the arena making it even easier.
- Enemies
- Strategy
It's recommended using a Blunderbuss and Pistol layout. This is because the Vulture Shaman can be one-shot using a Blunderbuss, making it easy to clear them. The Pistol for clearing out the normal Vultures, as they can be annoying if not taken care of right away. Using the Pistol is not necessary for the reason that it takes up ammunition, which when in higher waves can be important, instead just using sword attacks can work.
South Arena[]
The South arena is more difficult than the North or East arenas. This arena hosts a very dangerous enemy called the Dirk Gunman, that can only be found inside the arena and beyond the 8-module door in the south area. A total of 8 spawning platforms are in the arena making it hard to cover them all.
- Enemies
- Strategy
In this arena taking care of the ranged enemies first is priority. 4 out of the 7 have ranged attacks, meaning that many can hit you while trying to attack another enemy.
The Dirk Rocketeer should be the first one dead: his rocket deals 2 DMG and knocks you to the ground, making you extremely vulnerable to other enemies. While the rocket can hit other enemies (including itself), it will remain a pain to deal with. Waiting until they fire then going in for the kill is the best way to get rid of them. Using a Blunderbuss to clear the Leapers and Bladebots is the simplest way to kill them.
Even though the Slimes may not seem important, they are. Leaving them last is a bad idea simply because they constantly attack you, and if caught in-between attacks they can rack up a lot of damage. The Dirk Gunman is an enemy that wields a mini-gun, and fires a series of 7 bullets before cooldown. The cooldown is about 1.5 seconds, making this the opportune time to get hits in. Using the Blunderbuss is effective, because of the 5 damage and quick attack time, allowing you to go in and out between the attacks.
East Arena[]
The East area is the next easiest to complete as long as you can dodge the Plant Beast's attacks. It is the smallest arena out of the 5, and has 6 spawning platforms.
- Enemies
- Strategy
The main enemy that you have to worry about is the Plant Beast, because of its attacks. The Plant Beast can instantly charge you as soon as it spawns, making it hard to keep control of. The best way to kill them is by waiting until it charges, and once you've dodged you can go in with the Blunderbuss and deal 5 DMG, then finish it off with your Sword.
If there are multiple Plant Beasts try to separate them, or try to kill one off by separating them then focusing with a different gun. Leaving both alive can kill you instantly since they deal 2 DMG each. Dealing with the other enemies is simple, just make sure that you have the Dash Shield ability and the Sword Deflection ability.
West Arena[]
The West arena is the largest arena and the most difficult next to the South arena. Just be careful to not get hit by the Crystal Spiders.
- Enemies
- Strategy
Focusing on the Crystal Wolves attacks is important to do, since they will constantly try to attack you. To kill them, you have to avoid their first attack then go in and attack back. Second to the Wolves are the Pistoleers. They will try to shoot you, and can get overwhelming at times. Killing the Knights is a simple matter with the Blunderbuss, just be sure to not shoot when they are attacking, because they can reflect bullets.
The Brutes can easily be avoided and left to kill as the last thing. A simple way of killing them is to deal 2 DMG first, then shoot with the Blunderbuss dealing 5 DMG. This will bring them down to 2 HP making them easy to finish off. Unless the Spider is the last enemy, make sure NOT TO GET TRAPPED. Getting trapped by one makes you vulnerable to anything around you, basically making you die.
World Arena[]
The World arena, or the 5th arena, is unlock-able after clearing the other 4 arenas. The waves themselves consist of a mixture of all the World enemies.
- Enemies
- Crystal Brute
- Crystal Knight
- Crystal Knight Pistoleer
- Crystal Spider
- Crystal Wolf
- Vulture
- Vulture Acolyte
- Vulture Shaman
- Bladebot
- Dirk
- Dirk Gunman
- Dirk Rifleman
- Dirk Rocketeer
- Leaper
- Slime
- Bomber Toad
- Ninja Toad
- Plant Beast
- Plant Beastling
Reward[]
After beating all of the arenas, by surviving the 10 waves in each of them, another path will open up after beating the World Arena. This new path leads to the black Outfit.
| Hyper Light Drifter Areas | ||
|---|---|---|
| Main Areas | Abyss • Barren Hills • Central Town • Crystal Forest • Lake • Mountains | |
| Switch and iOS Exclusive | The Tower | |
| Sub Areas | Church • Dregs • Home • Horde Arena • Library • Lizard Camp • Monolith Gallery • Broken Shallows • Soccer Field • Treehouse | |
| Shops | Dash Arena • Sword Master's Dojo • The Pharmacy • The Tech Shop • Weapons Shop | |